

Building a gazebo roof
The roof of a gazebo can be its most defining visual element. Striking gazebo roofs can be constructed with hand cut rafters, sawed roof planks, wood shake shingles and a raised second roof or cupola for visual appeal and ventilation. I didn't do that because I decided my carpentry skills weren't up to it. Until I made that decision, I did a lot of research -- at this bottom of this page I provide several links to resources for building a gazebo roof from scratch. Mainly I describe here how I contracted for the design of a hip style truss roof with asphalt shingles on plywood.
Roof Design: Get a local truss company to help you.
Some gazebo plans will provide diagrams of rafters with minimal instructions on how to cut them. Cutting rafters is a skill frequently referred to as "the mark of a true carpenter" and the "hallmark of a real craftsman." These are things I will never be mistaken for. I made several mistakes building this gazebo, but I wasn't stupid enough to try cutting my own rafters. But if you think you are up to it, exposed rafters make a very beautiful interior and you can't beat the bragging rights of measuring, cutting, and assembling a hip roof built from rafters. There are many guides online and in carpentry manuals to get your started. Check out the bottom of this page for more information on this.
However, I compromised on beauty and skill by hiring the local roof company to design a build a truss. Provide them width and length of your roof area and they will computer design a truss, cut and assemble the truss pieces using their computer operated equipment, and then deliver them to your backyard. The truss is not as appealing a look as the hand cut rafters, which provide an open cathedral look, as discussed on this site.
For about $400, I got a local company to create and deliver a truss with layout plans. Here's my Google sketchup of the truss they built:

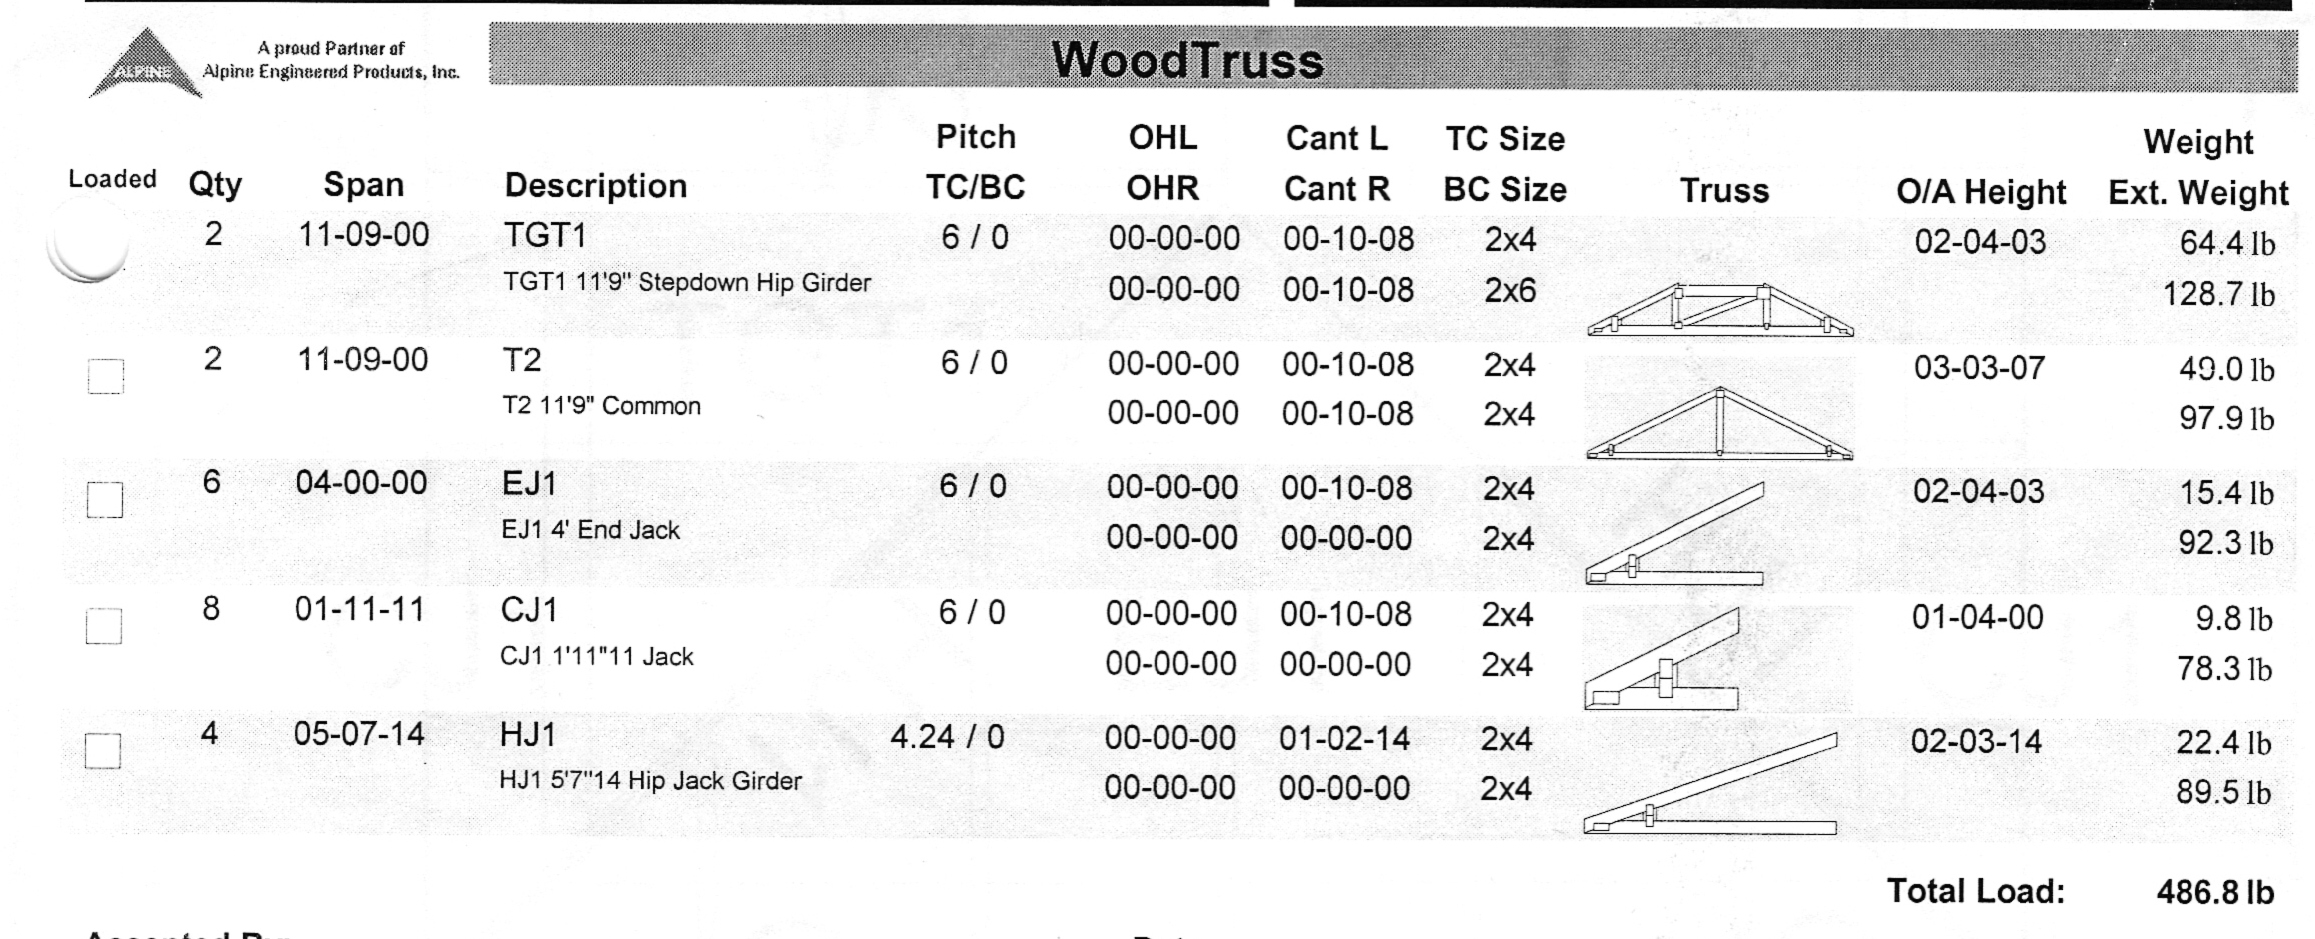
This is the truss list (click for a larger picture):
A couple of interior ceiling shots of the completed gazebo before refinishing or painting:


Actually, I think they look okay, but I didn't pick these pictures to make the truss approach look attractive. It's a very utilitarian solution and looks that way. I don't worry about the load of the plywood and shingles and the possibility that the walls will splay from excessive weight or poor joinery.
Trusses are not a complete walk in the park to assemble, though. I had to cut two additional rafters on either side of the common truss pieces to connect them to the stepdown girders (the wood truss diagram) so I got some of the joy of rafter cutting. I had to cut each of them at least twice because of mistakes. Lifting and stabilizing the girders while they attached also requires a patient helper. These trusses were attached using hurricane tie double plate rafter clips, which should meet most code. Jack rafters can be nailed at angles to the other truss elements fairly easily.
Plywood roof.
I used 3/8 inch exterior grade plywood of a common but not the worst grade. You can see knots and imperfections. I cut and arranged these in this pattern, which can be varied somewhat, but is limited by the dimensions of standard 4' x 8' plywood size.

The plywood must be carefully cut so the pieces meet on both vertical and horizontal dimensions with little gap. On this design, you only have to go two rows of plywood from the edge to the ridge. Use plywood clips to prevent warping (see picture). Joining them side to side is trickier -- each piece must meet on top of a truss board, which is only 1-1/2" wide, so you have 3/4" truss contact on each piece to nail it on. I found the only way to get it right was to position the uncut plywood piece on the roof and trace the joining trace board onto the plywood. After bringing it down, I marked the additional 3/4" as the cut line. It's a pain to put the board on twice (again, you need the very patient helper), but unless you've positioned your truss pieces with super precision, you will have some variation in the meeting angles along the four corners of the roof. Using roof planks instead of plywood sheaths would definitely be easier lifting and managing, although more cuts and measurements would be required. I definitely considered it while the patience of my helper grew thin in the heat of the day. The plank look would be very nice from the inside as well, and shingle nails poke through this thin plywood. But you don't spend that much time looking at the inside roof of your gazebo.
Shingles and felt.
I was worried about this phase, but it turned out to be not so bad. I used 30 lb standard roofing felt applied as described here. After three months of no rain, of course it rained the evening I put on the felt and before I had put on the shingles. As a consequence, the felt wrinkled significantly (see picture below). But I was told this would not be an issue, since the weight of the shingles would compensate. I had no gutters to contend with, since I believed the area around the gazebo could accommodate rain runoff. This means I don't have any plantings or other objects that would be affected by the directness of a rain drip. As you can see in the picture, I did add a drip edge for not too much more money.
Attaching shingles was actually pretty easy and fun, since I didn't have a lot to do. Techniques for basic application, and for corners and ridges are explained in many places. Do it yourself shingling is explained here, for example. I used a dimensional style shingle that matched the Owens Corning shingles I had on my house. Dimensional shingles give you a nice shake-style look and you can afford to splurge here, given the small area and the fact you are providing your own labor.

This roof does not leak. I wanted a good roof to protect the structure and minimize rot, and I wanted to install electricity so the less moisture inside, the better. Ultimately, this roof keeps you dry in most rains, but storm winds will drive rain through the sides.
At this stage, I had completed the basic gazebo described in my plan -- the one that is shown in the sketchup file. I decided the whole thing had a bit more wobble that I liked, so I added 2" x 6" angled cross braces at each of the corners, using deck screws the attach them. They attach to the corner posts flush with edge of the post, as shown in the picture below.

For the finishing touches, read Rails, Screens and Other Finishes...
If you want to build your own gazebo roof from scratch, bless your heart. Even putting up the truss roof and finishing it with a few hand cut rafters were a struggle for me. I’ve provided a few resources from my own research on building your own below. These all relate to rectangular style gazebos – the ornate problems of the hexagonal or octagonal gazebo roof are not covered here. The roof style you are most likely to consider is the square or rectangular "hip" style, in which four equally pitched triangles or near triangles meet. The truss roof I describe above is this style. A gable style, where two pitched rectangles meet, is also possible, and has slightly less complicated framing, but it doesn’t look as nice. Check out these links for various aspects of how to build a gazebo roof.
For inexpensive gazebo plans (only $5.50) for a 4-sided 12’ square gazebo with hip roof similar to the one I built: http://www.ecrater.com/p/5893999/4-sided-gazebo-hip-roof-building#
What hip, jack, and common rafters are and how to check for "rafter splay" on gazebo hip roof:
http://www.bestdecksite.com/introRoofsPg1.htmYou can design your own roof by deciding the pitch, rafter layout, and overhang dimensions. An excellent resource if you going to build your rafters is the the hip roof framing calculator at:
http://www.blocklayer.com/roof/roofeng.aspx. Also check the Timber Tailor’s video http://www.youtube.com/user/thetimbertailorSome Google sketchup models that show hip or gable roof detail
when rotated:Rectangular Gazebo with rafter style roof:
http://sketchup.google.com/3dwarehouse/details?mid=d1f83842db9987f77bcf118226a89a3e&ct=mdsaThis rectangular gazebo model shows rafter detail and also has a nice variation for railings on your gazebo
: http://sketchup.google.com/3dwarehouse/details?mid=c7f516c6912a5e99c6cf0060471989dc&prevstart=24You can finish the top of the gazebo with a cupola or other feature. This SPA type gazebo has a sunroof:
http://sketchup.google.com/3dwarehouse/details?mid=662c087ad2d7d75517954c0cb543e01a&prevstart=144Two paneled roof – sort of a pagoda style:
http://sketchup.google.com/3dwarehouse/details?mid=aa1e90352206b02963ea1ad9c9ecfe70&prevstart=228Open pergola style roof:
http://sketchup.google.com/3dwarehouse/details?mid=ef028f8d7a4e8e7bb6e20146e11d7c44&prevstart=264Another rectangular
hip style with rectangular detail:http://sketchup.google.com/3dwarehouse/details?mid=3f63c8e7b10d9b3cc9962128ecf38acb&prevstart=324Combo hip/gable style with rafter detail:
http://sketchup.google.com/3dwarehouse/details?mid=2fb83c66e25356fc1169bb170b13e807&prevstart=408